Finger-per-Fret: The Bass Exercise That Keeps on Giving
Learn the finger-per-fret bass exercise with notation and TAB. Build clean fretting, finger independence, timing and two-hand coordination from day one.
This is the first exercise I teach almost every beginner, the first exercise I was taught when I began and one I still use more than twenty years later. If you are thinking about taking bass lessons, consider this a free first one.
Most beginners expect their first obstacles to be musical: notes, rhythms, scales or songs. With the bass guitar, I usually find that the first set of obstacles are physical rather than musical. A bass is a large, slightly unwieldy thing. Neither hand has moved quite the way we are asking it to when we play the bass, and now the two of them have to work together in new, highly co-ordinated ways.
So before we ask the hands to make music, we break these physical challenges down into simple, solvable bits using the finger-per-fret exercise. We overcome the physical limitations so that they disappear when we approach musical challenges.
What is the finger-per-fret exercise?
Choose four neighbouring frets and assign one fretting-hand finger to each:
- 1 — index finger
- 2 — middle finger
- 3 — ring finger
- 4 — little finger
Play fingers 1–2–3–4 on the lowest string. Repeat the same pattern on the A, D and G strings, then reverse the route and come back down.
I generally suggest starting around the ninth to twelfth frets. Many books begin at frets one to four, but those frets are wider apart, further away and need more force to fret cleanly. Starting higher up the neck lets you learn the movement without turning the exercise into a test of hand size or strength.
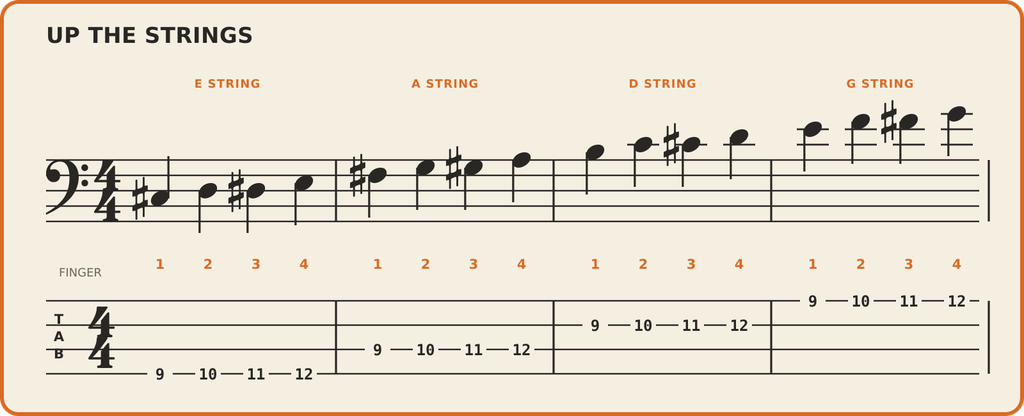
Play frets 9–10–11–12 on each string, from the lowest (nearest your chin) to highest (nearest the floor). The orange numbers are your fretting-hand fingers; the TAB numbers are fret numbers.
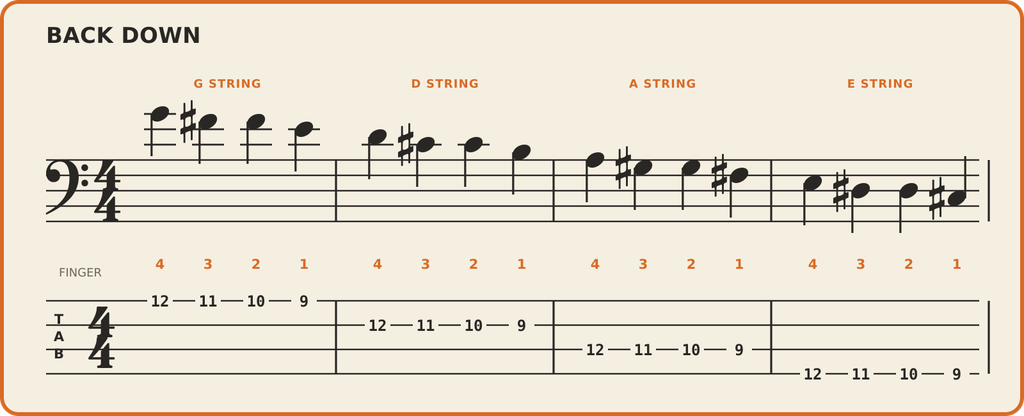
Come back down the strings from G to E, playing frets 12–11–10–9 with fingers 4–3–2–1 on each.
That is the whole pattern. Its value lies in what you notice while playing it.
What this simple bass exercise teaches
Finger-per-fret is often described as a finger-strength exercise. That is only a small part of it. Done attentively, it develops:
- accurate fretting;
- the ability to play with the minimum required effort (and so maximum efficiency of movement;
- independence between the fretting-hand fingers;
- coordination between the two hands;
- alternating between the index and middle fingers of the right (plucking) hand;
- control of unwanted string noise;
- even timing, volume and tone; and
- the ability to notice tension before it becomes a habit.
Think of it less as lifting weights and more as calibrating the instrument-player system. The aim is not to endure the exercise. The aim is to make every movement feel effortless and deliberate and every note sound good.
Story time: The month before the music
When I started playing bass in my first year of secondary school, I had already been playing bass trombone for five years. I arrived feeling reasonably musical and ready to get on with it.
My teacher (the peerless Mrs Kath Hume) had other (better) ideas.
As I remember it, we spent the first two weeks on the basic version of this exercise and the next two on permutations of it. I nagged, let’s play some music! But I trusted Mrs Hume, kept at it and was richly rewarded. By the time we reached the music, I was not fighting the instrument to play it. My hands already understood how to play the bass, so I could play the music.
After all my playing, my studying, my learning and my teaching, I cannot do better than the peerless Mrs Hume. That is why the first thing that I teach beginners is the first thing that she taught me. The principle makes perfect sense: establish the basic physical skill first and you free more of your attention for rhythm, sound, listening and expression (which is to say, the things that actually make music.)
How to play it well
The pattern is easy to remember. The interesting work is in the details.
Fretting hand
use less force
Most beginners squeeze much harder than a clean note requires. Place a finger just behind the fret, play the note and gradually reduce the pressure. When the note begins to buzz, add back only what you need.
That is your useful pressure. Anything more is wasted effort.
Thumb position
Let the thumb rest lightly on the back of the neck, roughly opposite the middle finger (or sometimes index) finger. Think of the hand balancing around the neck rather than clamping it. Keep the wrist comfortable, the shoulder down and the fingers gently curved.
As you play 1–2–3–4, allow the earlier fingers to remain lightly in contact with the string if you can do so without strain. The moment the hand starts twisting, gripping or hurting, stop and reset. Move the exercise higher up or lower down the neck if necessary to find something comfortable.
Generally, there is no reason for that thumb to be peeking over the top of the neck.
Plucking hand:
alternate and follow through
For this exercise, alternate the index and middle fingers strictly: index, middle, index, middle. Consistent alternation makes the movement predictable and exposes any difference in sound between the two fingers.
Let each finger pluck through the string and come to rest on the next string, rather than pulling it away from the body of the bass. Keep the thumb supported, either on a pickup, on the E string or moving across the strings with you. Ultimately, this thumb becomes part of your muting system.
Different players use different anchoring and floating techniques. The goal is simple and there are many ways to achieve it: stay relaxed while the strings you are not playing remain quiet.
Both hands: agree on the moment
A clean note needs the fretting finger to arrive just before the plucking finger plays. Too late and you hear a buzz or a dead note; much too early and the exercise becomes hesitant.
Listen for four things:
- Does every note begin cleanly?
- Is every note the same length?
- Are the notes even in volume?
- Are the unused strings quiet?
This is not easy. For example, at first your little finger may produce an apologetic wee mumble, rather than a beautiful ringing note. That is normal and useful information, not failure. Slow down until you can hear and correct it. This will take time.
A ten-minute practice routine
As an example way in to the exercise and playing. You may find that this is too long at first (don’t push through sore fingers or discomfort) or too short (as you get into the depths and details).
Set a metronome (something like to 50–60 bpm might be an appropriate place to start) and play one note per click. If that does not leave enough time to prepare a clean, relaxed note, go slower.
- Two minutes: settle. Get comfy. Adjust the bass, drop the shoulders and find the lightest fretting pressure that works. Play some open strings to practise alternating. Get your ear in and refocus the habit of listening carefully.
- Three minutes: up and/ or down. Play the written exercise without stopping for too long. Listen for one specific quality (for example, first clean attacks, then even volume, then unwanted noise.
- Two minutes: repair. Isolate the least reliable transition. It might be ring finger to little finger, or moving from the G string back to the D string. Practise this in detail. Think about it. Visualise it being how you would like it to be. Revisit this detail in context.
- Three minutes: revisit or vary. You may like to go back to up and down. Or you may choose one of the variations below and keep the same standard of sound.
Do not raise the tempo because you survived the exercise. Raise it only when the notes are consistently clean and the body remains easy. An increase of two or three bpm is plenty.
Short, attentive daily practice beats one heroic weekly session.
The exercise that keeps on giving
Once 1–2–3–4 feels familiar, the pattern becomes a framework for variation. Try:
- A different finger order: For example, 1–3–2–4, 4–2–3–1 or any of the 24 possible permutations.
- A different route across the strings: ascend on one string, descend on the next and continue alternating.
- Position shifts: play the four notes, move the entire shape by one fret and repeat.
- Rhythmic changes: play each note twice, or for twice as long, or for half as long, or three times, or any other rhythm you can think of without changing the fretting pattern.
- Accents: make every fourth note louder, or every third note, or the fourth note on the E string, the third note on the A string, the second… etc. Your hands keep playing in fours while your ear follows a different cycle. This gets interesting fast…
- String crossing: repeat two neighbouring fingers across two strings, such as 1 on the E string, 2 on the A string, 3 on the E string and 4 on the A string. Etc.
Creativity is not an optional extra here. Inventing variations teaches you to transfer a movement rather than merely memorise one pattern. This is the royal road to getting your brain, your hands and your bass working together.
One finger per fret is an exercise, not a law
Remember: no one is saying you have to hold a four-fret stretch everywhere on the bass, in every musical situation.
Hands differ. Basses differ. The lower frets are wide. Part of learning to play is learning to shift position, release fingers and use alternative fingerings as needed. Often when “grooving” the left hand will cover a two or three fret area for reasons that will become clear later.
For now, if maintaining one finger per fret creates pain or forces the wrist into an awkward angle, the exercise has stopped serving its purpose.
Practise the shape in a comfortable part of the neck. Gradually move it towards the wider frets as your coordination improves, but never force the stretch. Ease and control are the goal.
When should you move on?
You do not need to perfect finger-per-fret before you are allowed to play a song. Use it alongside music from the beginning. Five or ten focused minutes at the start of a practice session is enough.
You are ready to make the exercise “harder” (or more complex or faster) when you can:
- play up and down without losing the pulse;
- produce a clean, even note with every finger;
- alternate the plucking fingers without thinking about it;
- keep the unused strings reasonably quiet; and
- finish with no pain and no more tension than you began with.
If it feels awkward, that does not necessarily mean you need more repetitions. Often, one small adjustment to the height of the bass, the angle of the neck or the position of a thumb changes everything. (That is where a teacher watching you in real time can save weeks of guessing.)
Go slowly. Keep it easy. Listen to every note. Enjoy playing!
I’m Jack Elliot, a professional bassist and teacher based in Leith, Edinburgh. I teach complete beginners, as well as experienced players looking to take their playing to the next level. If you’d like some help with your bass playing, book a bass lesson in Leith.